Class 20: Finish! by Yvonne Watson

It’s been 10 weeks since the beginning of this production simulation and I am very sad for it to end. It was truly a wonderful experience to be in sort of a middle ground between a school environment and real world production. Thank you to everyone at The Mill for giving us this opportunity to work with you, and for all the great feedback that was given to each and every group. This is an experience I know I will always be thankful for.

I have grown very much as a person and an effects artist since the beginning of this class. I knew nothing about how effects were brought into other programs, how to work with lighting and compositing, and how much iterating on an effect truly matters. At the beginning, I thought it was crazy to spend the entire 10 weeks working on one effect, but for someone with minimal knowledge coming into the class, I think it was for the best that I was given a smaller effect like car exhaust. And even with all the time given, I still came short of many goals for the sim. I believe I have a better idea of how deadlines are necessary and how much planning goes into these project before they even begin.

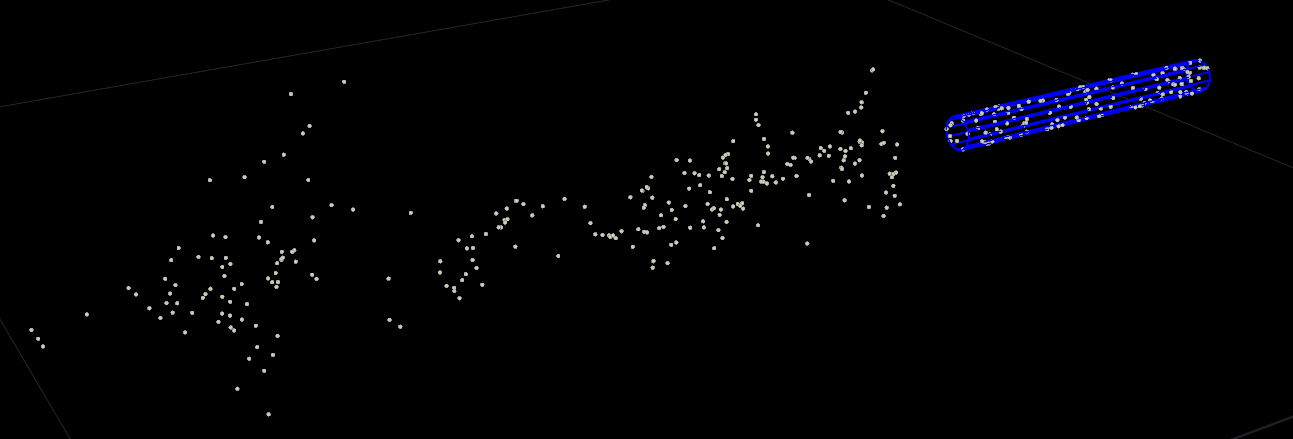
Last quarter, I had taken my first real effects class which went over things from particles to RBD dynamics to pyro. This was my pyro project for that class:

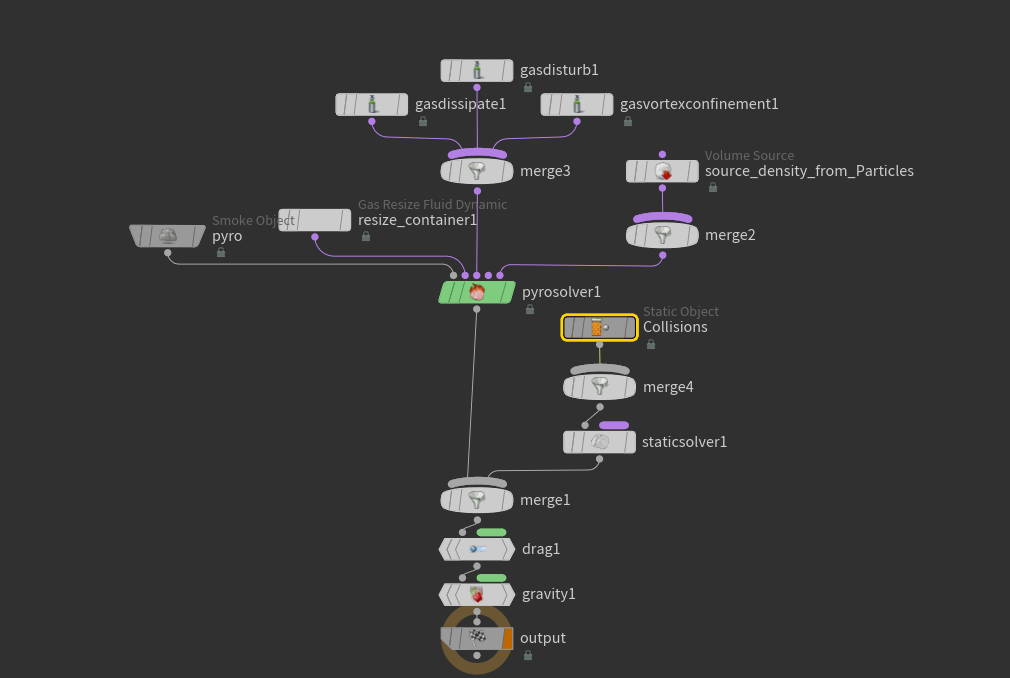
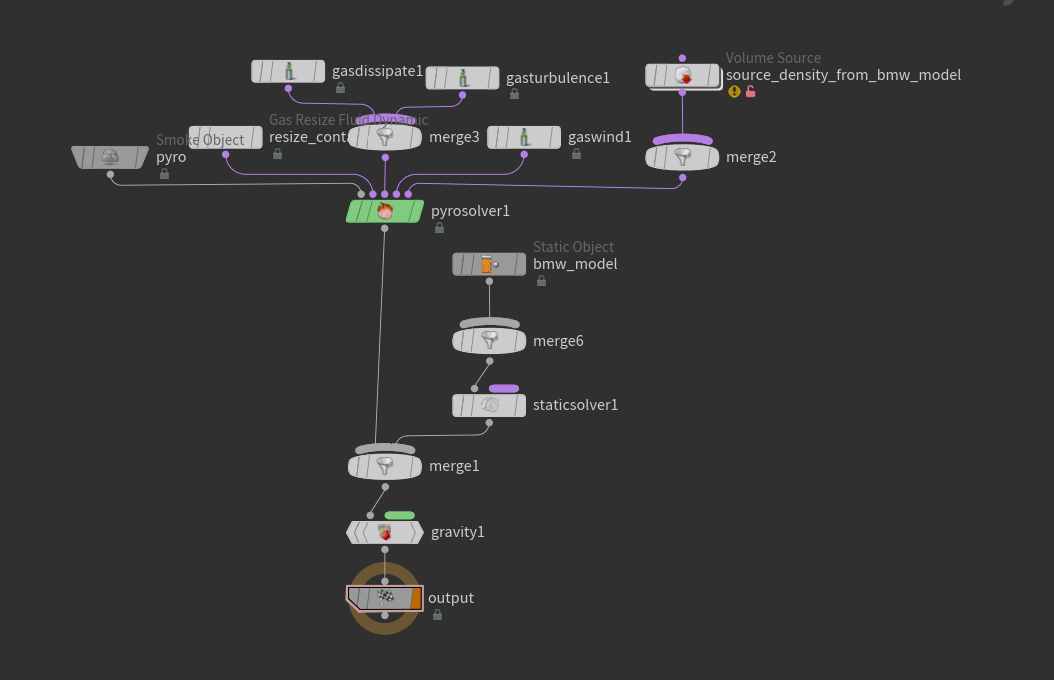
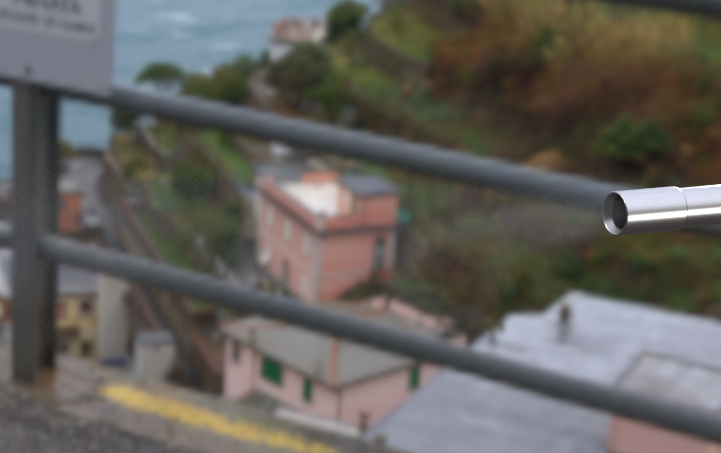
I struggled with this project and even at the end of it, I still wasn’t sure what I was doing. Comparing the first exhaust render to the final one, I can see how much I’ve been able to refine the sim. Even if the sim doesn’t look like it has major improvements, I learned so much about the process, iteration, refinement, and general pyro knowledge.

If I had a chance to take another collaborative class, I would take it with The Mill again. It was such a great experience to be able to show our progress to people who are interested in our projects week after week. Thank you guys again for everything and I hope to see everyone again in the future with more skills under my belt!

Class 19: Gotta Go Faster by Yvonne Watson

With this final version of the exhaust sim, I believe I was mostly successful with the shape of the smoke and the speed of it. I have almost doubled the speed since last time we presented our video so it should look much better now. The shader is a bit less dense now, so the smoke looks much better in terms of thickness, as well as a bit lighter in color too. While this sim is mostly successful, I was not able to control the density with a volume. I believe this is mostly due to my lack of knowledge with controlling pyro with volumes, and possibly due to the fact that sparse pyro does not have a set container size like the standard pyro solver does. If I was able to get this volume working, I would have been able to handle my two biggest issues of controlling the density so it is thinner closer to the source, as well as use another volume to control the velocity so that it slows down as the exhaust enters the volume. I plan to continue learning about using volumes so as I become more experienced with that, I might eventually understand how to incorporate the use of volumes in a pyro sim.

Class 18: Always Room For Improvements by Yvonne Watson

Before I add a second faster layer, I want to try controlling the sim with a volume one more time. I have a functional volume to use, but sourcing it into the pyro sim is doing strange things which I’m not sure how to troubleshoot. I am not very knowledgeable about using volumes to control fields, so I will have to do more research tomorrow and ask classmates if they have any suggestions.

If this cannot be resolved by thursday night, I will abandon it and focus my time on the second layer.

Class 17: Final Lap by Yvonne Watson

I feel that this sim is finally looking how I wanted it to in the beginning. There are several things that I still want to do for it but I am not sure if there is time to fix it. I will continue research up until the last possible moment and beyond that if necessary. I am hoping to have the density gain visibility over time, but at this rate, I am not sure if that will be done in time for the final submission. At any rate, as my first big project on a pyro effect, I am very happy with how it is coming along. More research and tests for density control will be done until it is fixed or or submitted for the last time.

Class 16: Gotta Go Fast by Yvonne Watson

My group and I found that the wrong shader was being used in our main project file so we were able to resolve the issue of the exhaust smoke being insanely thick. Simple issue that is thankfully fixed now. Currently, I am working on speeding up the exhaust sim.

I think the new speed looks much better. I want to work on getting more shredding in there without the smoke looking too particulate and calm down the disturb a bit so that it isn’t swishing around like a streamer. After that, I will be able to work on the second layer again. I hope to have this layer finished by friday night so that the second layer and blending them can be ready by monday for final critiques.

Class 15: Refining the Exhaust by Yvonne Watson

After cutting the turbo out, I’ve been able to spend more quality time working on the exhaust. Taking Todd’s advice to use a second, faster layer for the exhaust, I am now spending the time blending them to make them look like they are one.

This is the current new version of the exhaust. There are two layers here, though they aren’t very noticeable. and the shader density needs to be much thinner. I had originally combined both sims into the same file cache but I will seperate them out for the next version so I have control over the density of the bigger sim.

This is the newer version I’m working on. I made a bit of space between the fast layer and the wide/slow layer but that needs much more tweaking. I’m happy with how the fast sim is looking so I am spending most of the time working on the wide layer. This layer is being a bit of a pain because it isn’t expanding as much as I want to. Right now, it looks the same as the faster sim but changing the shape of the emitter might help with that.

I want to have a strong version of this by wednesday and I think I am very close to that. The fast sim looks good, I just need to spend time on the wider slower layer for them to look cohesive.

Class 14: Trimming the Fat by Yvonne Watson

After lots of trial and even more error, my group and I have decided to scrap the turbo effect. With my current knowledge of Houdini, the animation is too fast for me to handle, destroying the pyro in the process. Currently, I feel pyro is not the way to go with the sim. I think if it were possible with pyro, then it would take too long to render out from Houdini for my team to use.

The sim begins to thin heavily as the car moves. Whenever I attempted to shape the flame with micro-solvers like disturb or turbulence, the flame would thin out even more and look very particulate. In this case, the pyro is inheriting the velocity o…

The sim begins to thin heavily as the car moves. Whenever I attempted to shape the flame with micro-solvers like disturb or turbulence, the flame would thin out even more and look very particulate. In this case, the pyro is inheriting the velocity of the car which seemed to smooth out the flame, but it loses the shape of the emitter.

Even with higher substeps (6 on the left, 3 on the right), The flame did not form properly. This is the pyro without the inherited velocity. It does not look thin and grainy like the sim with the inherited velocity, but it also retains its shape too…

Even with higher substeps (6 on the left, 3 on the right), The flame did not form properly. This is the pyro without the inherited velocity. It does not look thin and grainy like the sim with the inherited velocity, but it also retains its shape too much.

After testing turbo pyro for about 2 weeks with no leads, I decided that true pyro might not be the way to go. Atleast, not for someone with my current level of understanding on pyro. I decided that I might try to run noise through a volume field to mimick the choppy effect from the flames that I wanted. I put this together in about an hour and I feel that if I had decided to use this method a week ago, then it would turn out alright, but due to time constraints, this effect will be dropped.

This is the newest version of the exhaust in the first shot. Seeing it here, I will thin the smoke a lot more than it is, and I want to make it much shorter and faster. I plan to continue experimenting with a volume field to effect the velocity and/or density if the standard gas micro-solvers do not work.

Class 13: Extreme Makeover: Pyro Edition by Yvonne Watson

With Todd’s advice in mind, to make the exhaust less dense at the base, and slowing the velocity of the sim as it ages, I have been experimenting with volume field to control the density and velocity of the sim. I have managed to get the volume functional and controlled with a ramp and direction, but it does not seem to be connecting into the pyro sim properly. Houdini gives me no immediate errors, but the way that I think it is supposed to work, and the way it is actually working is very different.

With this new sim, I like the shape of it, but the velocity and density need adjustment.

Learning from some tutorials to build a custom velocity field, I have put together this network which creates a density to be read into the pyro sim. Visualizing the trails and the density of the field, it seems to be working properly.

Learning from some tutorials to build a custom velocity field, I have put together this network which creates a density to be read into the pyro sim. Visualizing the trails and the density of the field, it seems to be working properly.

Simple controls for the velocity field.

Simple controls for the velocity field.

The exhaust sim is no longer particle based. I have rebuilt it in H18 using sparse pyro. The shape is easier to control and takes half the time to test and sim.  Still, the issue here is the second volume source which pulls in the velocity field.

The exhaust sim is no longer particle based. I have rebuilt it in H18 using sparse pyro. The shape is easier to control and takes half the time to test and sim. Still, the issue here is the second volume source which pulls in the velocity field.

I am still fuzzy on how this volume import works. I assume that the Source Volume is the attribute that is brought in from the given SOP Path. This then effects the Target Field with whatever Operation is selected. Currently, I don’t understand what…

I am still fuzzy on how this volume import works. I assume that the Source Volume is the attribute that is brought in from the given SOP Path. This then effects the Target Field with whatever Operation is selected. Currently, I don’t understand what the Field to Match means. I assume this causes the Source Volume to follow the path of this field and effects everything in it. I feel there may not be time to complete this and the turbo effect with how much time remains. This exhaust sim will be my priority until it is finished, then I will look into creating a turbo effect with the advice Todd has given for the turbo.

Class 12: El Fuego by Yvonne Watson

After the decision to switch to sparse pyro in Houdini 18, several issues have been solved. Thinness and choppiness of the flame is gone and it is now quick to sim. But I am learning that sparse pyro is difficult to shape. It also seems to be exporting fields differently when caching VDBs. This is causing issues when bringing the VDBs into Arnold in Maya for rendering. I have not found a solution yet to the Arnold problem but I hope to have it worked out by the beginning of next week.

EDIT: The issue with bringing sparse pyro VDBs to Arnold Maya has been fixed. The arnold documentation recommends converting to VDBs then caching out those VDBs. This is not the case with sparse pyro. Just attaching the file cache to the Pyro Post-Process node that is created when using a sparse pyro preset, and checking the “convert VDBs” checkbox will create functional VDBs.

Issues with the render farm has resulted in our video not having all the sims in it. I have locally rendered my exhaust sim and comped it over our video. The timing is slightly off, probably due to this being a separate render.

Class 11: Testing, Testing, and More Testing by Yvonne Watson

I’ve run into many issues with this turbo flame sim so far. The main issue is still that the animation moves extremely fast. I have had suggestions to try using trails or clusters, but I currently do not see how they would be useful for this sim. I found a tutorial by Peter Quint for rocket smoke that uses point velocity to help with bridging the gap between each frame that is emitting particles. It works much faster than jacking up the substeps and allows me to keep the substeps low. Combining that with velocity blur, it seems to help quite a bit. But even still, the issue with such a large gap between rendered frames is present. These problems occur with the pyro in Houdini 17.5, but recently, I have experimented with the sparse pyro in Houdini 18, which seems to remove majority of these issues, allowing me to work on increasing the flame size and shaping it.

From one frame to the next, there’s a massive gap in the flames. This particle based method for fast pyro seems to take a long time to adjust due to the particles needing to be cached before the pyro can even be looked at. It is a great solution for…

From one frame to the next, there’s a massive gap in the flames. This particle based method for fast pyro seems to take a long time to adjust due to the particles needing to be cached before the pyro can even be looked at. It is a great solution for normal/slow flames but for something like this, I do not see it working very well unless there is a step that I am missing.

While the color and shape will need a lot of work, this was assembled in minutes using the new sparse pyro in Houdini 18. There is no visible gap in frames and does not have a particle driven source. I believe I will spend more time looking into thi…

While the color and shape will need a lot of work, this was assembled in minutes using the new sparse pyro in Houdini 18. There is no visible gap in frames and does not have a particle driven source. I believe I will spend more time looking into this method to see if it will truly work for what i need it to.

Another big concern of mine is how to use Arnold’s volume and volume shader for this pyro. The tutorials I have seen usually have some kind of flame appearing in their render without having to adjust any settings on the shader. The documentation doe…

Another big concern of mine is how to use Arnold’s volume and volume shader for this pyro. The tutorials I have seen usually have some kind of flame appearing in their render without having to adjust any settings on the shader. The documentation doesn’t seem to be very thorough on how to set up for pyro and has old documentation on exporting VDBs from Houdini.

Overall, This sim is very concerning to me with the amount of issues I have run into already. But I will continue to experiment with sparse pyro as this as given me a good starting point right out of the box.

Class 10: Dawn of The Second Sim by Yvonne Watson

Moving on from the exhaust sim for now, I am starting the sim for the turbo flames when the car boosts through the loop. I have several concerns about this sim, mainly due to the speed of it. The car moves just about a whole 1 meter unit in Houdini per frame which I know will probably cause a lot of problems with the flames.

Since this sim is coming from the same area that my last sim is coming from, I set up my networks mostly the same way. Imported the car, removed excess geometry, copied the proxy geometry and particle source to points on the animated geometry, then …

Since this sim is coming from the same area that my last sim is coming from, I set up my networks mostly the same way. Imported the car, removed excess geometry, copied the proxy geometry and particle source to points on the animated geometry, then created the sims.

The particle sim is currently nothing special. Because the sim is moving so fast, I lowered the life span of the particles to .04 just so there wasn’t a super long trail of particles behind the car. I increased the turbulence in the pop wind node to…

The particle sim is currently nothing special. Because the sim is moving so fast, I lowered the life span of the particles to .04 just so there wasn’t a super long trail of particles behind the car. I increased the turbulence in the pop wind node to 8 so there isn’t a spaghetti noodle of particles coming out of the pipe.

I was having trouble with the emission of the particles in the beginning, because of the speed of the sim, using a short tube to emit particles would show clear gaps between frames. After some testing, I learned that simply making the tube longer he…

I was having trouble with the emission of the particles in the beginning, because of the speed of the sim, using a short tube to emit particles would show clear gaps between frames. After some testing, I learned that simply making the tube longer helped because the emission overlapped in the next frame, covering up those gaps.

I have not done any work with the pyro yet, but from just creating a basic flame, I can see that there will be issues with the density of the flame. I assume increasing the particle emission could fix it and help with the texture. I plan to adjust t…

I have not done any work with the pyro yet, but from just creating a basic flame, I can see that there will be issues with the density of the flame. I assume increasing the particle emission could fix it and help with the texture. I plan to adjust the emission timing as well so that there are short flames like the ones in my reference.

Class 09: Finalizing the Exhaust by Yvonne Watson

I ran into issues of my exhaust sim taking way too long to sim, so I went back through everything and cleaned it up. Originally I was using proxy geometry for the collisions and had no issues with that. When I added the animation, I did not know how to get the proxy geo to stick to the animated exhaust pipe. I started using the animated exhaust pipe as the collision geometry, but this turned out to be too thin of geometry and greatly increased the sim time. So I looked into finding ways to constrain the proxy geo to the animated geo, and found the copy to points node to do exactly what I needed. More refining will be done, but I will also be starting the turbo flame sim so small tweaks will be presented for this sim in the future.

Some refinements to look into is how one layer of the exhaust is being pushed out way further than the rest, the floating smoke balls, and the general uniformity of the sim.

This network has been cut down significantly since the particle source and the collision geometry have been moved to different containers for organization. This is where the animated car is brought in then extra unnecessary geometry for the sim is r…

This network has been cut down significantly since the particle source and the collision geometry have been moved to different containers for organization. This is where the animated car is brought in then extra unnecessary geometry for the sim is removed.

The tube proxy geometry is copied to the animated exhaust pipe. Using the proxy geo allowed me to make my division size higher , speeding up the sim.

The tube proxy geometry is copied to the animated exhaust pipe. Using the proxy geo allowed me to make my division size higher , speeding up the sim.

Learning from the issues with the collision geometry, I decided to make the particle source geometry separate from the animated geometry. This gives me more control over where the emitter is in the exhaust pipe and how big it is.

Learning from the issues with the collision geometry, I decided to make the particle source geometry separate from the animated geometry. This gives me more control over where the emitter is in the exhaust pipe and how big it is.

The source geometry for the particles is then brought into this container where the pop sim is applied, cached, then converted for use in the pyro sim. While this could probably be in the same container as the source geometry is, I separated it so i…

The source geometry for the particles is then brought into this container where the pop sim is applied, cached, then converted for use in the pyro sim. While this could probably be in the same container as the source geometry is, I separated it so it is easier for my eyes to follow, and easier to locate issues.

Inside the pop solver, I have added a second layer of particles. Originally, I wanted to find a way to control the drag so that a second layer for this sim wouldn’t be necessary, but due to time constraints, I stuck with just using a second layer an…

Inside the pop solver, I have added a second layer of particles. Originally, I wanted to find a way to control the drag so that a second layer for this sim wouldn’t be necessary, but due to time constraints, I stuck with just using a second layer and moving on.

The pyro sim hasn’t changed much since last time. The biggest change would be adjustments to the gas container so that unnecessary space was not being calculated in the sim.

The pyro sim hasn’t changed much since last time. The biggest change would be adjustments to the gas container so that unnecessary space was not being calculated in the sim.

Class 08: Experimentation by Yvonne Watson

I have been working on final adjustments to my exhaust sim for speeding up the initial velocity and having it slow down as it lingers in the air. I have been experimenting with the POP drag node in the popnet, but it seems to be evenly applying drag to even the newly spawned particles. I want to find a way to have a decay rate where each particle will slow down over time or possibly a volume to pass through to control the speed of the particles. I did not make much progress in terms of this but the over all feel of the sim seems to be a little better. I plan to finish this by the end of class 8 so that I can spend the time between then and next class doing preliminary reference research for the turbo flames sim.

My pyro net has has the turbulence and drag removed as they were causing more of the particle smoke balls to pop through the smoke. I will probably add them back in later after I handle the speed issue of the smoke.

My pyro net has has the turbulence and drag removed as they were causing more of the particle smoke balls to pop through the smoke. I will probably add them back in later after I handle the speed issue of the smoke.

Not much has changed in the popnet either but I did add POPdrag which seems to handle the particles a little better than the drag force node did.

Not much has changed in the popnet either but I did add POPdrag which seems to handle the particles a little better than the drag force node did.

Currently, not much has changed in terms of the structure and look of the exhaust but possible solutions have been found and research into these solutions will happen during class 8.

Class 07: Restructure by Yvonne Watson

After Todd’s suggestion to make the pyro a particle sourced sim, I have created a popnet for the particle emission and a pyro dopnet which sources those particles. The whole sim is much easier to control now that it is particle based and has some natural disturbance from the particle emitters interacting with each other.

The popnet is where most of the changes happen. Currently it is a simple set up using only drag and wind. The variation and swirls are created from the wind node. Turbulence might be added later.

The popnet is where most of the changes happen. Currently it is a simple set up using only drag and wind. The variation and swirls are created from the wind node. Turbulence might be added later.

The pyro has some dissipate and turbulence on it to make some variation and wind to put it with the particles. I had put drag on there at one point, but that was pushing the smoke too far back, revealing little smoke balls come out from the sim.

The pyro has some dissipate and turbulence on it to make some variation and wind to put it with the particles. I had put drag on there at one point, but that was pushing the smoke too far back, revealing little smoke balls come out from the sim.

On the left is the network for the particles. In the middle and in the viewport, is the proxy collision geometry because the exhaust pipe from the car had several holes in it which let some of the smoke escape. On the right, is the rendered exhaust …

On the left is the network for the particles. In the middle and in the viewport, is the proxy collision geometry because the exhaust pipe from the car had several holes in it which let some of the smoke escape. On the right, is the rendered exhaust pipe.

Since we plan on using Arnold in Maya, I cached out the VDB to bring into Maya to see what it will look like.

Since we plan on using Arnold in Maya, I cached out the VDB to bring into Maya to see what it will look like.

Using aiVolume and a aiStandardVolume shader, I saw that it seems a bit wispier than it appeared in Houdini. It might be due to the shader settings. I feel the thickness of the exhaust is pretty accurate to what I am going for though.

Using aiVolume and a aiStandardVolume shader, I saw that it seems a bit wispier than it appeared in Houdini. It might be due to the shader settings. I feel the thickness of the exhaust is pretty accurate to what I am going for though.

Class 05: R&D by Yvonne Watson

After finalizing the effects we planned to do for our commercial last class, I have started R&D for a car exhaust smoke effect in Houdini. I have created a very basic sim coming out of the exhaust pipe and the next few weeks should be fine tuning the effect. Currently, some things I am looking into is getting the sim to dissipate at a closer distance, making it thinner in general, and adding a slight wave to it so it looks like air is pushing the exhaust around.

houdini_8nH4XkDYAi.png
The smoke in my reference is very thin and barely noticeable. It is much more noticeable in motion, so I suggest viewing the video in this post.

The smoke in my reference is very thin and barely noticeable. It is much more noticeable in motion, so I suggest viewing the video in this post.

Class 03: First Critique by Yvonne Watson

The groups pitches were critiqued today and everyone received great advice. My group, Team Matchbox, was given the advice to cut the portal and live action shots as the portal was a “cheat” to get to our goal of a live action shot. While I was excited to work on a portal, I understand where they are coming from. The portal was out of place in the hot wheels environment, popping up out of no where, making the transition from CG to live action feel forced. We have taken the mentors’ advice and have removed the portal and live action shots from the previs. We have also changed the shot where the hot wheels track sways and breaks to a GoPro style shot with the camera stuck to the top of the car as it travels around the loop. This makes the sway and break of the track unnecessary, therefore I will be taking over some pyro shots from Kush.

Class 02: Reference, Reference, Reference by Yvonne Watson

My group has decided to make a hot wheels race with the hero car going into turbo, blowing away its competition and the track in the process. As an effects artist in this group, I am responsible for the track sway and break, as well as the portal for the car to drive into. I could not find any reference for Hot Wheels tracks breaking, so I am using broken plastic and videos as my reference. For the portal, I am referencing the portal from Doctor Strange, as well as the time vortex from Doctor Who (when did doctors become so popular in the sci fi world?).

498672122fff6ef8003951d796655047.jpg
I like the detail in the crack for these two pieces of plastic. I think the top image will be closer to what I will make for the track break. I plan to experiment with vellum and different types of fractures for this part.

I like the detail in the crack for these two pieces of plastic. I think the top image will be closer to what I will make for the track break. I plan to experiment with vellum and different types of fractures for this part.

I really like the spark effect in Doctor Strange but I want it to be a bit more subtle. Absolutely a particle effect but the motion is very fast. Seems simple but usually easier said than done.

I really like the spark effect in Doctor Strange but I want it to be a bit more subtle. Absolutely a particle effect but the motion is very fast. Seems simple but usually easier said than done.

A flatter version of this would be in the middle of the portal. Maybe some experiments with cellular noise would produce this?

A flatter version of this would be in the middle of the portal. Maybe some experiments with cellular noise would produce this?